Add New Controls to Excel UserForm
Add New Controls to Excel UserForm
In this article, you will find code for adding new controls to an Excel User Fom, for adding items to comboboxes and to create an array of values from a range of cells.
There are many situations that requires a dynamic userform, to add new comboboxes, textboxes as other controls. The challenge is to control the position of the new controls, and relocate the existing controls, to avoid overlapping.
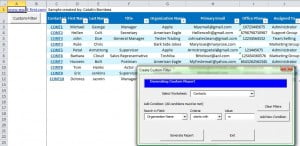
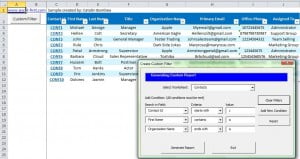
Let’s take a look at both situations: in first image, there are no extra controls in the User Form, in the second image, I added 2 extra lines, each line contains 3 controls (2 Combo Boxes and a Text Box):
(click on graphic below to view a larger image and escape to return)
I am a fan of Excel Defined Tables, so this example contains 3 sheets, each sheet has its own defined table.
For automation purposes, to make the code shorter, easier to understand and more flexible, each table name is identical to sheet name.
The scenario for building the form is simple: I have 3 tables, I need to be able to search in one or more columns of the table contained in the selected worksheet. By default, the form will have controls for a single condition (where a condition contains a combo for Column Name, another combo to select from a criteria like “start with”, “contains”, and a textbox with the value to search for.)
The Add Condition button from the User Form will add another set of controls, to set a new condition for filtering the table.
Important note:
The VBA code for applying filters is very basic, just for demo purposes, that is, you cannot apply more than 1 criteria for the same column. If you apply more than 1 criteria for the same column, in the sample file provided in this article, only the last criteria will be applied. Again, to reiterate, the filter can apply multiple conditions to different columns only!
Before explaining the code, you should download the workbook and then follow along in the workbook the explanation below to better understand what is going on:
Download sample file: Add New Controls to User Form.xlsm
The VBA code for adding new controls to the User Form used in this demo workbook:
Private Sub AddButton_Click()
Dim NextTopValue As Double, SpaceBetween As Double
Dim NewTextBox As MSForms.TextBox, NewCombo1 As ComboBox, NewCombo2 As ComboBox
SpaceBetween = 6 'set the space between lines
NextTopValue = AddCondition1.height + SpaceBetween
Me.height = Me.height + NextTopValue 'increase the height of the form with default control height plus the space height
ResetButton.Visible = True 'we can display the reset button, this way you can reload the default form

'move down these 2 buttons, otherwise the new controls will be placed over them:
Generate.Top = Generate.Top + NextTopValue
CancelReport.Top = CancelReport.Top + NextTopValue

'add combo for the new condition table headers:
Set NewCombo1 = Me.Controls.Add("Forms.ComboBox.1", "AddCondition" & (NewSet), True)

With NewCombo1
    .Top = AddCondition1.Top + NextTopValue * (NewSet - 1)
    .Left = AddCondition1.Left
    .width = AddCondition1.width
    .height = AddCondition1.height
    .MatchRequired = True
End With

FillCombo NewCombo1, ArrCells 'fill combo with Table Headers

'add combo for the new condition criterias:
Set NewCombo2 = Me.Controls.Add("Forms.ComboBox.1", "Criteria" & (NewSet), True)
With NewCombo2
    .Top = Criteria1.Top + NextTopValue * (NewSet - 1)
    .Left = Criteria1.Left
    .width = Criteria1.width
    .height = Criteria1.height
    .MatchRequired = True
End With

FillCombo NewCombo2, Arr 'fill combo with criterias

'add a textbox for the new condition search value:
Set NewTextBox = Me.Controls.Add("Forms.TextBox.1", "Val" & (NewSet), True)
With NewTextBox
    .Top = Val1.Top + NextTopValue * (NewSet - 1)
    .Left = Val1.Left
    .width = Val1.width
    .height = Val1.height
End With

'increase the NewSet number for the next line
NewSet = NewSet + 1

End Sub
The code is fairly simple, the .Top value for each new control is calculated based on the NewSet number and the .Top value of the default control. Because we already have a default condition line 1, the form will be initialized with NewSet value set to 2.
Because we have 3 Tables, when you select another worksheet in the User Form, the column names of that sheet’s defined Table will be filled in all Field Combo Boxes, using a simple procedure, that will extract all column names from the Table and add them to the field Combo Boxes.
The selection of the Worksheet is monitored by that Combo’s _Change event, which will activate the selected sheet, and also will change all header names from Field combos:
Private Sub ComboBox1_Change()
Dim Ctl As Control, Cell As Range, i As Integer
On Error Resume Next
Application.Goto Worksheets(ComboBox1.Text).Cells(1, 1)
ClearFilters_Click
ReDim ArrCells(1 To Worksheets(ComboBox1.Text).ListObjects(ComboBox1.Text).HeaderRowRange.Columns.Count)
i = 1
For Each Cell In Worksheets(ComboBox1.Text).ListObjects(ComboBox1.Text).HeaderRowRange
    ArrCells(i) = Cell
    i = i + 1
Next Cell
For Each Ctl In Me.Controls
    If Ctl.Name Like "AddCondition*" Then FillCombo Ctl, ArrCells
Next
On Error GoTo 0
End Sub
The array created will be passed to the next procedure, that will add all items to ALL Combo Boxes with a name similar to “AddCondition*”.
Private Sub FillCombo(CBox As ComboBox, Values As Variant)
    CBox.Clear
    Dim i As Integer
    For i = LBound(Values) To UBound(Values)
        CBox.AddItem Values(i)
    Next
    CBox.ListIndex = 0 'display the first item
End Sub
This procedure accepts an array of values to be added for the specified Combo, the Combo Boxes will display the first item.
Using Excel Defined Tables will eliminate the problem of locating the headers row in each sheet, your Tables can be located anywhere in sheet. This is only one of the many advantages of working with Excel Defined Tables.
I will definitely write more about Tables, there are lots of amazing things that can be done using Excel Defined Tables…
Have fun 🙂

